Troubleshooting
This is a brief description of known issues that can occur, and possible solutions. Most of these are a direct result of NOT using our tools or not following the instructions we provide.
If your problem is not in the list or you are not able to solve it, please contact technical support.
General issues
My tour is stuttering, have low frame rate or other performance issues.
Explanation:
This may happen because of several things:
- Your device is performing a demanding task at the moment, e.g. when a PC is rendering 3d images there may be a framerate drop in 3d tour as well
- 3d model in a tour is not sufficiently optimized, if you downloaded low poly model yourself
- Your device is not powerful enough to process the tour
- Your browser is not supported
Solution “a” - check if your device is performing other resource demanding tasks at the moment, restart the device if necessary.
Solution “b” - when optimizing model yourself, try to reduce number of polygons to 200k or less. If not possible, than upload high poly model and use our optimization algorithm. Remember, that plants and scattered objects may impact your polycount significantly.
Solution “c” - try using other device. Generally most of smartphones and tablets from 2018 and onwards (and flagship models from earlier) should perform well.
Solution “d” - try using Google Chrome instead.
General tip - open 3d tour on a different, preferably more modern device.
It takes a lot of time to download the tour. I am constantly seeing download icon, when travelling through the tour.
Explanation: your internet connection is not fast enough at the moment to provide best experience
Solution “a” - use VR player for PC or mobile applications for iOS and Android to download and view the tour offline
Solution “b” - check your internet connection and solve any related issues
Solution “c” - as a last resort you may open a tour and keep it opened for some time, travel between different points in a tour. When most of the point will be cached in your browser, your user experience will improve
Points on a tour minimap are not in line with point location in a tour.
Explanation:
If you followed our tutorial for rendering floor plan, than this may be a result of an object, outside bounding box.
Solution: open asset editing page and hover mouse over the floor section. Press “Adjust minimap position”:
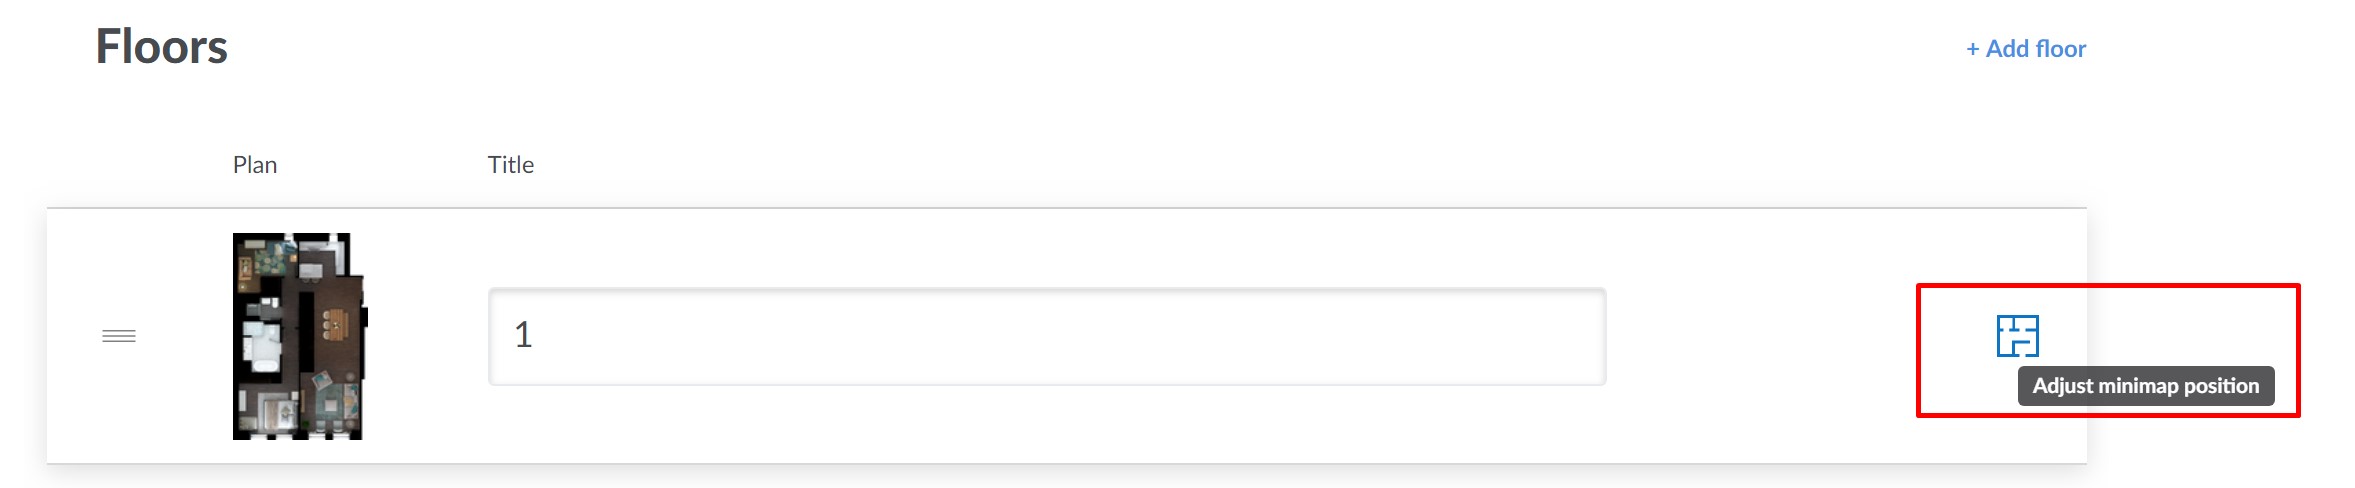
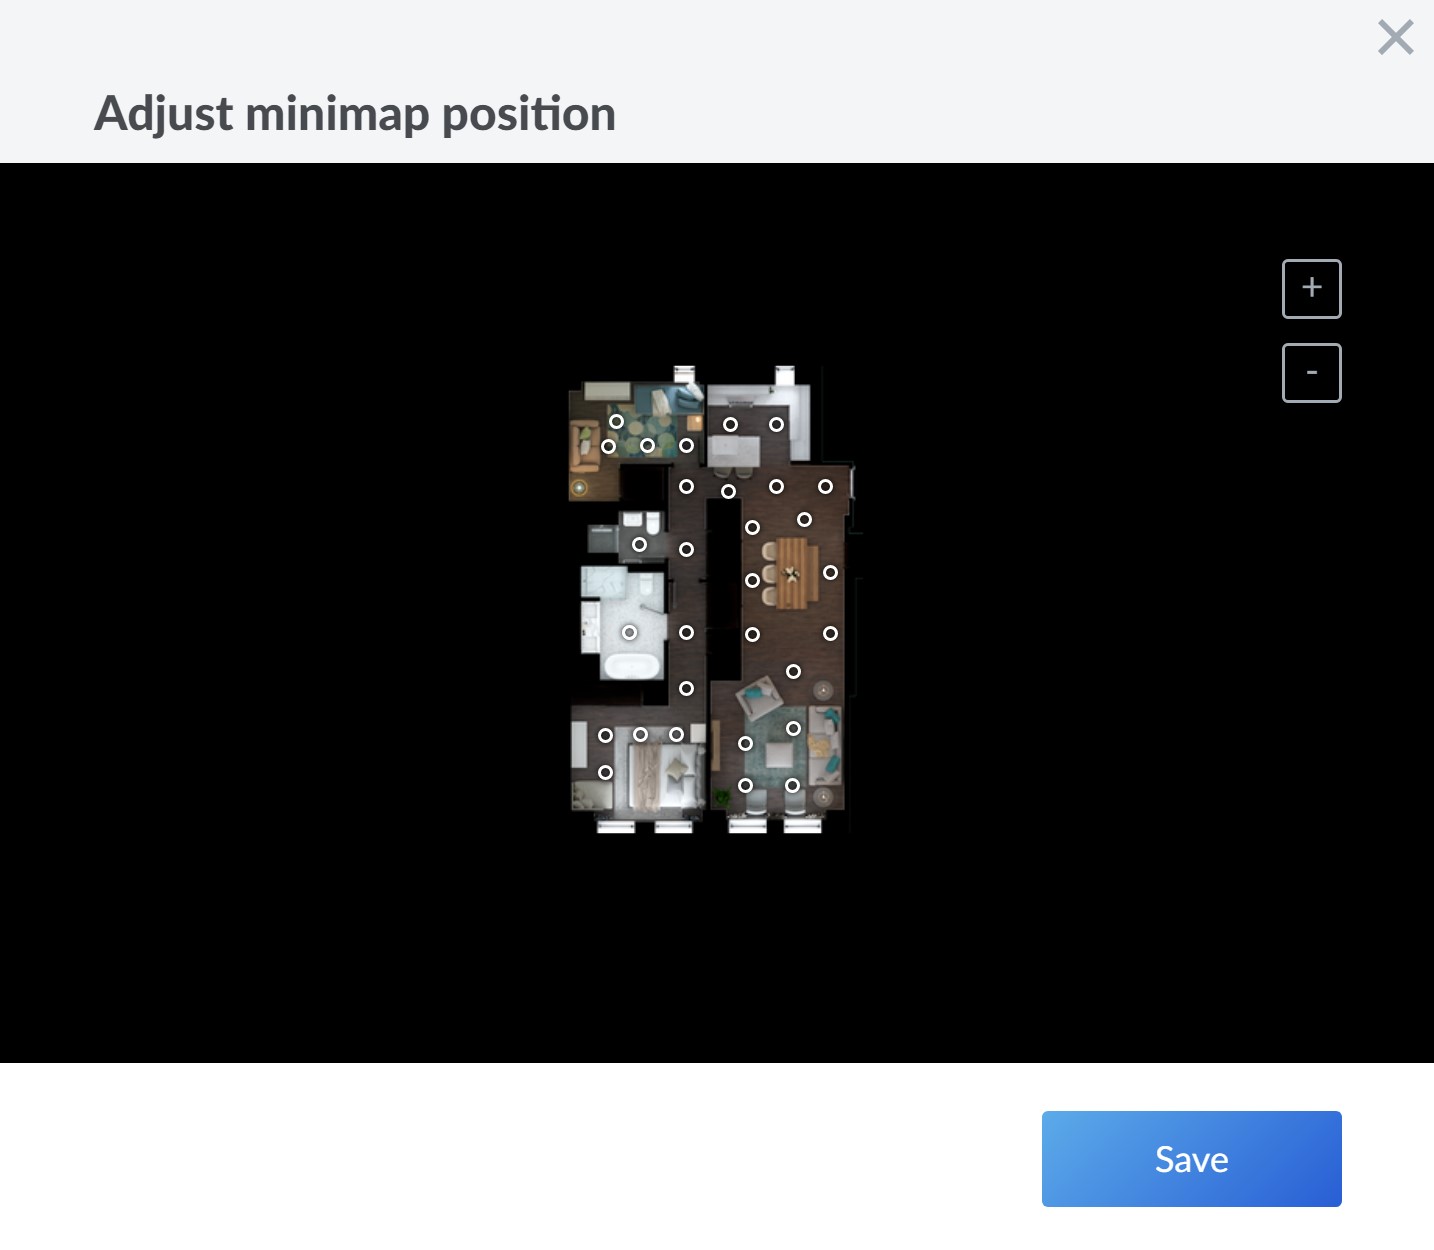
If points in a tour are not in line with the minimap, you can change it here. Move and zoom your minimap with mouse to fix any issues with floor plan.
3d model related issues
Object looks “flat” or has blurry trail, when travelling between the points.
Explanation:
If these effects occur, than the object is likely missing from 3d model. This can be a result of:
- Not using our tool and/or guide for preparing geometry
- Not collapsing complex group of objects into single mesh (e.g. a chandelier, consisting of dozens of elements)
- Geometry being too complex to be preserved in the scene (e.g. a plant with several thousands of leaves)
- Object was created using scatter tools in 3d max (scatters are being disabled if you use our tools for export geometry)
Solution “a” and “b”:
- Use our tools to prepare geometry for the scene. Follow this guide carefully. Prepare geometry and export correct model.
- Press “Back to assets uploading” inside tour assembly interface. Upload new, correct model and press “Create tour” to reassemble the tour.
Solution “c”:
- Complex objects, with lots of individual small elements are too taxing for tour performance. However, you can create a “proxy” object, which will resemble the shape of a problematic object and place it in your 3d scene manually. Prepare geometry and export correct model.
- Press “Back to assets uploading” inside tour assembly interface. Upload new, correct model and press “Create tour” to reassemble the tour.
Solution “d”:
- If you want to keep your scattered object in the scene, convert it to mesh first. Prepare geometry and export correct model.
- Press “Back to assets uploading” inside tour assembly interface. Upload new, correct model and press “Create tour” to reassemble the tour.
- Remember, that objects, with lots of individual small elements are too taxing for tour performance. Thus you may resort to the solution, mentioned above in “c”
It seems, like there is no object, when travelling between the points.
Explanation:
If these effects occur, than the object is likely missing from 3d model. This can be a result of:
- Not using our tool and/or guide for preparing geometry
- Not collapsing complex group of objects into single mesh (e.g. a chandelier, consisting of dozens of elements)
- Geometry being too complex to be preserved in the scene (e.g. a plant with several thousands of leaves)
- Object was created using scatter tools in 3d max (scatters are being disabled if you use our tools for export geometry)
Solution “a” and “b”:
- Use our tools to prepare geometry for the scene. Follow this guide carefully. Prepare geometry and export correct model.
- Press “Back to assets uploading” inside tour assembly interface. Upload new, correct model and press “Create tour” to reassemble the tour.
Solution “c”:
- Complex objects, with lots of individual small elements are too taxing for tour performance. However, you can create a “proxy” object, which will resemble the shape of a problematic object and place it in your 3d scene manually. Prepare geometry and export correct model.
- Press “Back to assets uploading” inside tour assembly interface. Upload new, correct model and press “Create tour” to reassemble the tour.
Solution “d”:
- If you want to keep your scattered object in the scene, convert it to mesh first. Prepare geometry and export correct model.
- Press “Back to assets uploading” inside tour assembly interface. Upload new, correct model and press “Create tour” to reassemble the tour.
- Remember, that objects, with lots of individual small elements are too taxing for tour performance. Thus you may resort to the solution, mentioned above in “c”
There are some “ghost” objects, whose are not on render, but appear, when travelling between the points.
Explanation:
Your 3d model does not correspond to renders. This can be a result of (a) changes in the scene, that were not reflected in 3d model, or (b) animated objects in the scene.
Solution “a”:
- Check, whether renders and 3d model were taken from different versions of the scene
- Press “Back to assets uploading” inside tour assembly interface. Upload new, correct model and press “Create tour” to reassemble the tour.
Solution “b”:
- Delete all animation from the scene, except Virtoaster camera. If you follow our camera creation guide (which you should), the script will do it for you automatically.
- Check if animated objects caused unnecessary effects on renders (e.g. animated chair has changed its location in different points in a tour). Render new, corrected images.
- Press “Back to assets uploading” inside tour assembly interface. Upload new, correct model and press “Create tour” to reassemble the tour.
I see a flat box instead of object, when travelling between the points.
Explanation:
This is a result of incorrect export of a proxy object. In 3d max proxy objects are being exported into .obj the way they look in 3d max viewport, e.g. if proxy view mode is “bounding\solid box” it will be exported as a box.
Solution:
- Use our tools to prepare geometry for the scene. Follow this guide carefully. Prepare geometry and export correct model.
- Press “Back to assets uploading” inside tour assembly interface. Upload new, correct model and press “Create tour” to reassemble the tour.
Unable to travel through the scene. Unable to walk backwards. When moving between the points, the whole scene creates blurry image without smooth transition. I am moving through the walls.
Explanation:
Your model is not in line with your renders, because:
- Incorrect renderer selected. Vray and Corona render cubemaps have different order of squares, thus selecting wrong render engine will cause incorrect model position
- 3d model scale is incorrect
Solution “a” - incorrect renderer selected:
- Check whether you selected correct renderer in your 3d scene. Unfortunately there is no way to see this information inside the tour yet (coming soon), so your memory is the best source of information. You may try the solution anyway, it is easy to reverse the changes.
- Open asset editing interface and press “Reupload” in the panorama list. Select your render sequence and select correct render. That should solve a problem.

Solution “b” - incorrect model scale:
- Use our tool to export 3d model from 3d max. Use our guide to prepare geometry.
- If you export 3d model from different software or unable to use our tool, make sure your 3d models .obj file is scaled in meters.
- Press “Back to assets uploading” inside tour assembly interface. Upload new, correct model and press “Create tour” to reassemble the tour.
Unable to travel to specific point.
Explanation:
Most likely there is a 3d object, preventing you from moving to desired location. It is either a (a) result of incorrect point placement, either (b) there is an unintended object between these points.
Solution “a”:
- Open your 3d scene to see, if there is line of sight between the points and if there are any 3d objects interfering.
- To adjust camera position, remove current Virtoaster camera and auxiliary 3d geometry, adjust point position and create new Virtoaster camera.
- Create file with points from camera creation script (use camera creation guide)
- Render new images for problematic points.
-
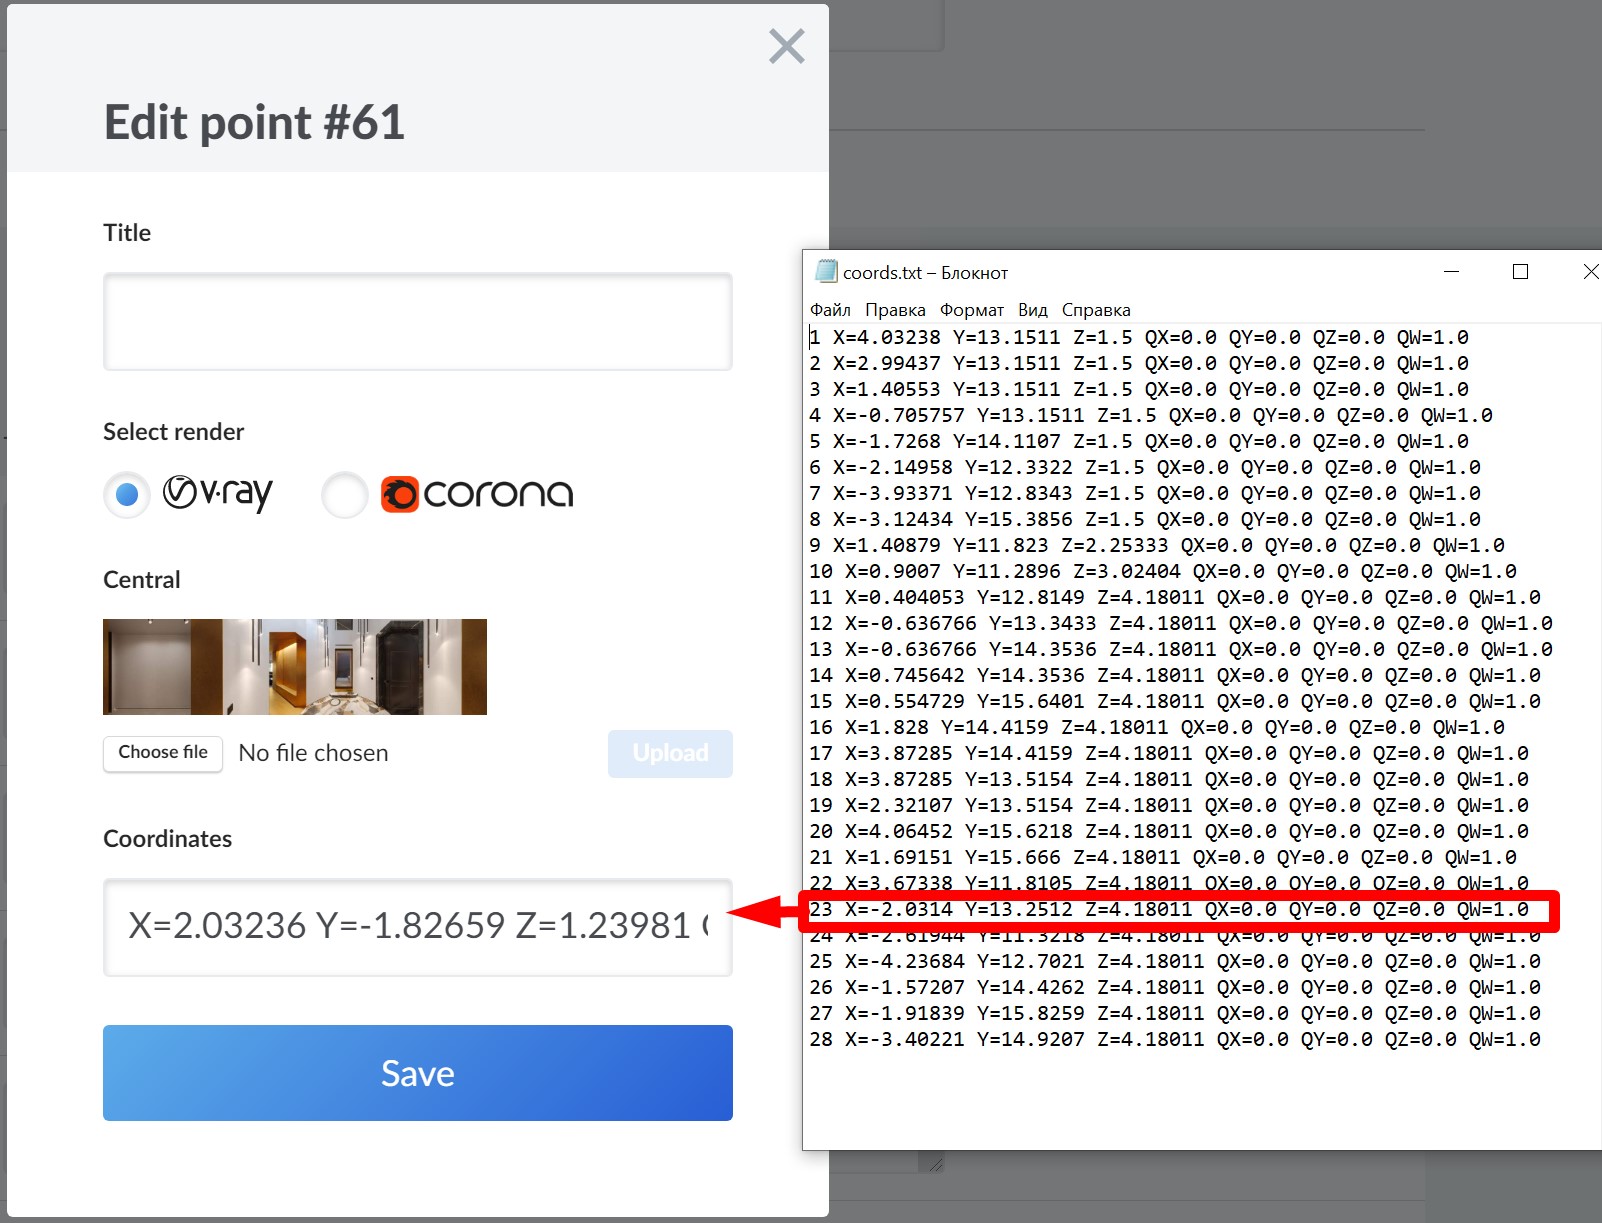
In asset uploading interface, hover over problematic panoramas and select “Edit”. You can learn point number from minimap in editing mode.

- Upload new image and paste coordinates of a point from the file to the text field.
Solution “b”:
- Open your 3d scene to see, if there is line of sight between the points and if there are any 3d objects interfering.
- Delete\move this object from the scene and render new images to reflect this change.
- Export new 3d model
- Press “Back to assets uploading” inside tour assembly interface. Upload new, correct model and press “Create tour” to reassemble the tour.
It seems like 3d model in a tour is shifted, compared to renders. It seems like borders of objects are not in line with rendered images.
Explanation:
Point coordinates are likely shifted from render position. This is a result of unintended movement of 3d scene, auxiliary 3d objects we use to determine coordinates or camera during render
Solution:
- Open your 3d scene and check if 3d model is moved relative to the camera or 3d helpers we use to define coordinates. If there is indeed a shift in the model, try extracting new coordinates using our guides for camera creation. Then create a new 3d tour using these coordinates
- Alternatively, you may try to adjust model position to the position, you can see on renders. Restore old scene or camera position from older scene versions if you have them. Then create a new tour using restored 3d model
- In any case there is no easy way around fixing this issue. Your best bet can be to start all over again with camera creation and be careful about moving 3d model or removing movement locks from camera this time.
Image and camera related issues
I see visible seams on my renders in a tour.
Explanation:
Visible seams on renders appear as a result of enabled post processing effects during image rendering or as a result of incorrect post production. Such effects as blur, DoF, Bloom, vignetting or sharp will cause visible seams, if applied incorrectly. Some of these effects should never be used for cubemap panoramas. If you are using Corona 4.0 or newer High Quality Image Filter under System tab is also known to cause these issues.
Solution:
- Check your render settings and post processing setup for these effects. Follow our guides for image rendering and postprocessing carefully. Replace existing panoramas with correct ones with asset manager.
- Check Image Filter type under System tab in the render settings. Disable High Quality Image Filter and select "None" or "Tent" filter type.
My camera is on the floor in tour. My points have incorrect height.
Explanation:
You forgot to change height, when placing points in your 3d scene.
Solution “a” - all points are on the floor:
- Follow our camera creation guide carefully and render new images
- Either export new 3d model, or use camera script to create file with coordinates.
- Press “Back to assets uploading” inside tour assembly interface. Upload new, correct model and press “Create tour” to reassemble the tour. Alternatively you can use old 3d model and upload file with coordinates manually (uncheck “Recognize coordinates from .obj”).
Solution “b” - only some points are on the floor:
- Render new images for problematic points, with new height
-
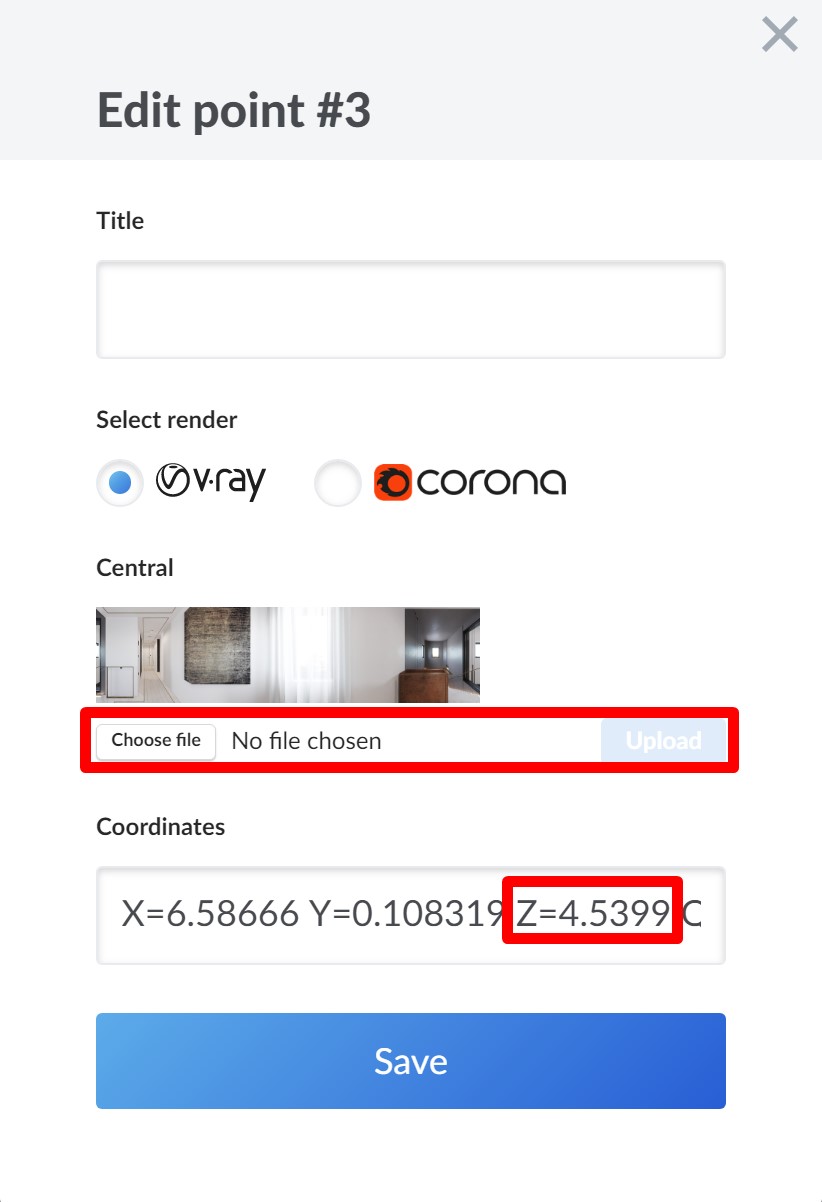
In asset uploading interface, hover over problematic panoramas and select “Edit”. You can learn point number from minimap in editing mode.
-
Upload new image and change height of a point (Z coordinate).
Usual height of a point is 1.5 meters above the floor. You can learn actual height from other, correct points in a tour or you can use camera script to extract point coordinates from the scene (more details in “Setting up camera” guide).
- Repeat for all problematic points
- Note, that you 3D panorama's textures may bake incorrectly, because they used point from the floor level.