Quick start guide
This is a quick start guide to walk you through the process of tour creation from A to Z and make your experience better. Good way to learn is to do something yourself, so we prepared a sample tour with all assets required to create it included.
There are two steps of this guide:
- Step 1 - become familiar with tour creation interface
- Step 2 - become familiar with our tools for 3d max to create assets
Step 1 - Create sample tour
By following this guide you will create a tour like this:
Sample tour
Start with downloading the asset package. Basic package contain final assets you can use as a reference or upload to the site as is:
- panoramic images with post production
- .obj file with 3d model
- optional .txt file with image coordinates
If you’ve already registered your account you will have a Trial plan already set up, so you can upload a several tours for free. Otherwise, please create an account first.
To create sample tour do the following:
- Download and unpack archive with assets somewhere on your computer
-
Press “Create tour” on the very top of the screen and create new folder for your tour or select
existing one. You will be redirected to the tour creation screen.

-
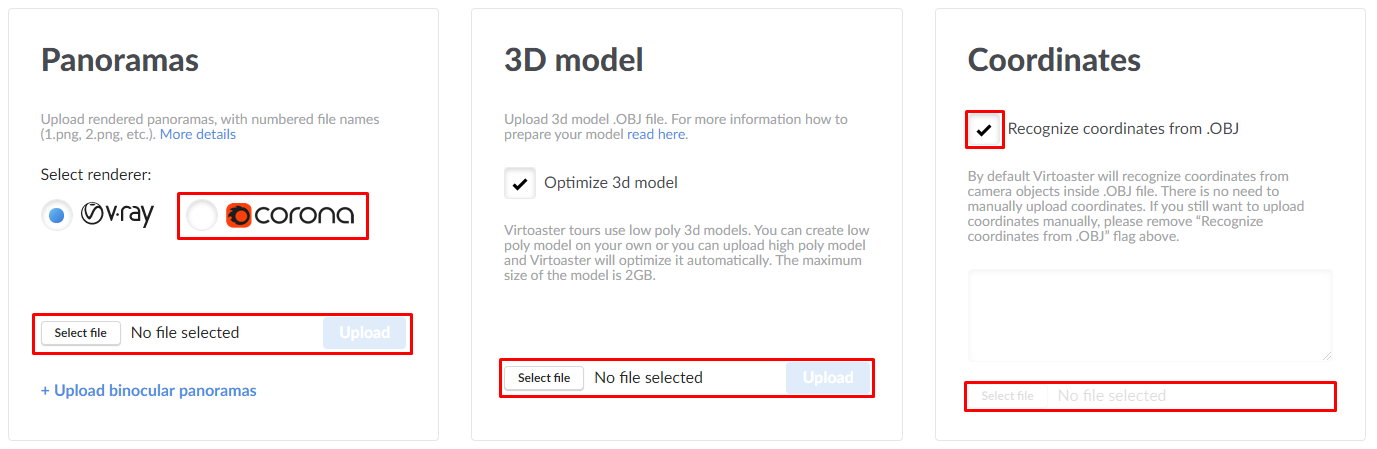
You will see three functional blocks, where you could upload tour assets. You can learn more details in Asset uploading article. For now, simply upload required tour assets:
- 3D model (highpoly.obj): press “select file” and select .obj file from the archive or drag’n’drop “highpoly.obj” to the “select file” area
- Select renderer: select render engine, select Corona for the sample tour
- Panoramas (Post_room_00xx.png files): press “select file” and select all images from the archive or drag’n’drop all images to the “select file” area
- Coordinates: keep default flag “Recognize coordinates from .obj”
There are some additional options in the interface. You can learn more about them in our Asset uploading article or by pressing additional options below.
Additional options
- Optimize 3d model: sometimes you can have a very simple 3d model (less than 200k polygons), so you can disable model optimisation we perform on a server side. Keep in mind that it is advised that you optimise your model anyway.
- Create 3d panorama view: 3d panorama mode is an experimental feature, allowing you to see the whole interior from bird’s perspective. You can turn this feature off and save a little time when creating a tour. You will not be able to create 3d panorama view separately though.
- Upload binocular panoramas: binocular panoramas have their own image for each eye and are being used to create better stereoscopic effect on VR headsets (e.g. to simulate stereo effect in reflections)
- Coordinates: there are two ways to set image coordinates. By default, our system will recognize coordinates from model (“Recognize coordinates from .obj” flag is checked), however this only works if you’ve followed the process precisely and use only our tools to create the camera in initial 3d scene. For troubleshooting purposes and unorthodox cases (e.g. you are using 3d package other than 3d max) we also have an option to upload coordinates as a text data. Receiving coordinates in the correct form is a separate topic and outside the scope of this guide however (see Setting up camera guide).
Once you’ve uploaded all required assets it’s basically done! However, before you press “Create tour”, take a moment and consider the following:
- In the bottom left corner of the screen you will see you tariff details: number of tours left, number of toasts (model uploads) left, etc. These are different, depending on your tariff. You cannot create tours if you exceed some of these limits.
- In the bottom right corner you will see error tracker. If there are some unresolved errors, you will not be able to create a tour.
- Some of the errors cannot be tracked when uploading assets. If something will go wrong, your tour will be returned to “loading assets” state and you will receive notification via your email.
- You can exit tour creation anytime, some of your progress will be kept. This is useful when you unable to resolve arising issues immediately and need some time to do it.

Press “Create tour” to complete your first virtual tour! Once you do so, your tour will be placed in queue with all the other tours. Time to complete sample tour is about ten minutes, however more complex tours might require more time, you will see the approximate estimation of time required, once you will press “Create tour”.
We hope that you will enjoy making this tour, if you want to proceed with asset creation, please open the second part of the guide.
Step 2 - Create assets
This asset pack is intended to give you a playground, where you can practice creating assets for Virtoaster, without preparing new scene specifically for this purpose. You can also use your own scene instead, general principles are the same, just follow the guide carefully.
Start with downloading the asset package. Advanced package contain:
- 3d max scene, (3d max 2016 format, Corona render)
- We do not provide complete set of textures due to legal reasons and their size, thus materials are set to a simple gray shader (basic Corona Mtl) and very basic lighting environment (Corona Sky and Corona Sun).
We’ve used Corona render to simplify the setup of the scene. If you are a VRay user, just add materials and apply basic light and render settings before proceeding with tutorial. Our scripts support both VRay and Corona, but you have to specify which render engine you’ve used when uploading assets (see first part of the guide).
Next, download our tools: Virtoaster Camera tool and Virtoaster Export tool. Now you can begin making assets:
Step 1. Set up camera.
Open 3d max file. Start with camera setup (you can learn process in details in Camera setup guide and Setting up 360 render guide).
-
Go to the top projection in viewport (hotkey T), drag “Virtoaster cam tools” script into the
viewport and press “Point”. Press left mouse button to place points where you want to travel
through the tour. Click right mouse button to stop. Distribute points evenly throughout the
space and only where it is physically possible to walk.
Important: For the purpose of the tutorial you do not need more than 3-4 points, since you will have to render them, but it’s up to you. - Now, select all points and place them at 1.5 meters above the floor. Do not forget to adjust for different elevation in different parts of the scene, e.g. if you have some points above the podium in the sample scene.
- Select all your points and press “Create camera”. Animated camera will be created, with each point corresponding to a single frame. Note, that some additional layers and objects will be created, once you press the button.
- With camera selected, press “Apply Virtoaster render settings” in the script. Script will automatically set the key settings for you and will return a message, to inform you about the changes it made.

Important: script will only handle the most required settings to make renders compatible with our system. Design and visual style is up to you. Also, be aware that special effects like “sharp” should be disabled. You can learn more details in Camera setup guide and Setting up 360 render guide render guide.
In normal circumstances this will be the end of the process, you are ready to render now. There is one additional step, which will be useful to you though:
- By default our system will recognize coordinates from the scene. However you can manually upload a coordinates of all your points, which is explained more thoroughly in our Uploading assets” guide“Uploading assets” guide. Press “Select camera” in “Create coordinates file” block and select Virtoaster camera. With camera selected, press “Create” in the script. You will be asked to select a location where to store .txt file with a coordinates on your PC.
Please render all points you’ve made, you don’t have to render clean images or make any postproduction, but you need to keep the resolution set by camera script. Since the resolution is quite large, we suggest to set pass limit to only 2 or 3 passes, this is just a test tour and quality in not a goal here.
Important: because you have created new points with new coordinates, images from Basic guide will not be compatible, they will not align with new point coordinates.
Step 2. Export geometry
To export the model from .max file with appropriate settings please use Virtoaster Export tools (you can learn process in details in Prepare geometry article)
- Drag “Virtoaster Export tools” script into the viewport
- Open “Delete modifiers” block and press buttons one by one to delete corresponding modifiers in the scene
- Open “Remove extra geometry” block and press buttons one by one to remove unnecessary objects (e.g. Corona portals in this particular scene).
- Open “Edit geometry” block. If there are some compound objects united by groups (e.g. group of table surface and table legs, or a chandelier with large number of elements) select this group and press “Collapse selected group” to receive single mesh. Repeat for other similar groups. This is not very relevant for this particular scene, but you can check “_books to collapse” layer for reference.
- Select transparent objects (e.g. window glass) and press “Make transparent”. See “_glass” layer in the scene for reference.
- Press “Convert proxy to mesh” to select all proxy objects and convert them to mesh (not relevant for sample scene).
- Open “Export geometry” block, select where to save your scene with “Save as” button. Press “Export” to export your scene.

As a result you should have the following:
- several 360 panoramas, rendered on your own
- a high poly model of the scene, exported on your own
- .txt file with coordinates (optional)
Now you can use these assets and create a tour, exactly as it is described in the Step 1 of this guide.
Important: Trial plan can be limited in amount of tours you can have. If there are not enough tours, just delete the tour you’ve made, when reading the Step 1 guide.
As you can see it is not that difficult to create 3d and VR tours using our tools, hopefully, this was useful to you!